When people hear the words “puppy socialisation”, the image that often comes to mind is a room full of puppies running around playing until their hearts are content.
Or perhaps taking your puppy everywhere possible so they can experience everything as soon as possible.
And while those things can sometimes play a small role in socialisation, they are only a tiny piece of the bigger picture.
In fact, when socialisation is misunderstood it can actually create the very behaviour problems we are trying to prevent.
So let’s talk about what puppy socialisation actually means, and how to approach it in a way that truly sets your puppy up for long-term success.
The Socialisation Window (And Why People Rush It)
There is some truth behind the idea that early exposure is important.
Puppies have a developmental period often referred to as the “socialisation window”, which runs roughly until 16–20 weeks of age.
During this time the brain is particularly flexible and receptive to new experiences.
After this stage the brain becomes a little less adaptable, meaning new experiences may require more gradual introductions.
However, this does not mean you must rush and expose your puppy to absolutely everything all at once.
In fact, doing so can overwhelm many puppies.
Socialisation isn’t about quantity of experiences.
It’s about quality of experiences.
Why “Let Them Play With Every Dog” Isn’t Always Helpful
Another common belief is that puppies should meet and play with as many other dogs as possible.
But if we simply allow puppies to run freely with any dog they meet, a few things can happen.
Some puppies learn that every dog they see means playtime, which can lead to frustration and reactivity later when they are on lead.
Others may be bullied by larger or more confident dogs, while some puppies may become the bully themselves due to size or personality.
Instead, puppy play should be thoughtful and monitored.
A few helpful guidelines include:
- Pair tiny puppies with other tiny puppies initially
- Match puppies with size-appropriate playmates
- Keep play sessions short to begin with
- Watch for balanced, reciprocal play
Even free-ranging dogs rarely play continuously for long periods. Most natural play sessions last around 10–15 minutes before dogs pause or regulate themselves.
If play becomes too intense or one puppy is overwhelmed, it’s perfectly appropriate to step in and give everyone a break.
Healthy play should allow both dogs to opt out whenever they need to.
Exposure Doesn’t Mean “Everywhere All At Once”
Another common interpretation of socialisation is taking a puppy everywhere possible.
Busy streets, crowded parks, cafés, buses, shops, dog parks…
But this approach doesn’t take into account one very important factor:
Your puppy’s personality.
A confident, outgoing puppy might cope well with a little more novelty.
A quieter or more sensitive puppy may need more gradual introductions.
Rather than trying to expose your puppy to everything immediately, it can be helpful to prioritise experiences in layers.
For example:
Primary Socialisation
Things your puppy will likely encounter regularly in their life:
- The school run
- Local parks
- Car journeys
- Walking near traffic
- Visiting a café
Secondary Socialisation
Situations they may encounter occasionally:
- Visiting shops
- Meeting new people
- Bus or train travel
- Outdoor seating areas
Tertiary Socialisation
General “just in case” exposures:
- Umbrellas
- Scooters and bikes
- Loud household noises
- Moving vehicles
- Children running or playing
Many common behaviour problems later in life — such as barking at scooters, reacting to buses, or being nervous of tall people — often stem from missed or rushed exposure during puppyhood.

The Risk of Doing Too Much: Flooding
In the dog training world, overexposure has a name.
It’s called flooding.
Flooding happens when a puppy is exposed to something beyond their ability to cope with.
This pushes them over what we call their threshold.
When this happens, puppies may respond in a few ways.
Some may shut down completely, becoming very quiet or still. This can sometimes be mistaken for calm behaviour, but in reality the puppy may simply be overwhelmed.
Others may become overstimulated, showing behaviours such as:
- Mouthing
- Grabbing
- Growling
- General agitation
Neither response means the puppy is “being naughty”.
It simply means the situation was too much, too soon.
Learning to Read Your Puppy’s Body Language
One of the most valuable skills for new puppy owners is learning to observe what their puppy is communicating.
Ask yourself:
- Are they trying to move closer to investigate?
- Are they turning away or increasing distance?
- Are they doing a mixture of both?
We also need to think not only about what puppies are exposed to, but how long they remain in that situation.
Some puppies cope well with a new experience for a short period, but may need frequent breaks.
Subtle signs that something required effort for your puppy might include:
- Shaking off their body
- Yawning
- Lip licking
- Turning their head away
- Stopping to scratch
These behaviours can actually be self-regulation.
If you notice them, it’s a great time to reward your puppy and give them space to move away.
A cheerful “good shake!” and calmly increasing distance can go a long way in helping puppies process what they’ve just experienced.
Socialisation Can Happen At A Distance
Another common misconception is that puppies must be right next to the thing they are being socialised to.
In reality, socialisation can happen very effectively from a distance.
Many puppies — particularly more thoughtful or sensitive ones — are excellent observers.
They prefer to watch a situation first, gathering information before deciding whether it feels safe to approach.
This observational learning is incredibly valuable.
Sometimes the best socialisation session looks like sitting quietly on a bench while your puppy watches the world go by.
The Power of a “Chaperone” Dog
Because dogs are social learners, they often learn a great deal through mimicry.
A calm, confident adult dog can act as a wonderful teacher for a young puppy.
Watching another dog calmly walk past traffic, greet people politely, or ignore distractions can help a puppy understand that the situation is safe.
However, it’s important that the chaperone dog is:
- Calm
- Predictable
- Comfortable around puppies
This is one of the reasons I often suggest allowing a first dog to fully mature before introducing a second.
A well-adjusted adult dog can become a fantastic role model.
Structured Socialisation vs The Dog Park
If you don’t have access to calm, well-mannered dogs, consider joining a structured puppy socialisation group where interactions are guided and monitored.
This helps ensure puppies learn appropriate play skills while staying safe.
In contrast, dog parks can sometimes be overwhelming environments, especially for young puppies. They often contain dogs of mixed temperaments and energy levels, which can easily lead to overstimulation or negative experiences.
Thoughtful exposure is far more beneficial than uncontrolled interactions.
What You Can Start Working On Early
Socialisation isn’t just about the outside world.
Many important foundations can begin within the first week or two of bringing your puppy home, including:
- Short micro-absences to build independence
- Introducing a marker cue such as “yes”
- Teaching your puppy to settle on a magic mat
- Beginning gentle crate training
- Establishing good toilet training routines
These small early lessons help puppies feel safe, confident, and capable as they explore their environment.
Socialisation Is About Confidence, Not Chaos
True puppy socialisation isn’t about doing everything quickly.
It’s about helping your puppy feel safe, curious, and capable in the world around them.
That means:
- Gradual exposure
- Thoughtful play
- Watching body language
- Allowing rest and recovery
When we approach socialisation this way, we don’t just create a puppy who tolerates the world.
We help raise a dog who feels comfortable living in it.
Find my socialisation check list below (remember to take it slow) and more importantly have fun with your new pup.
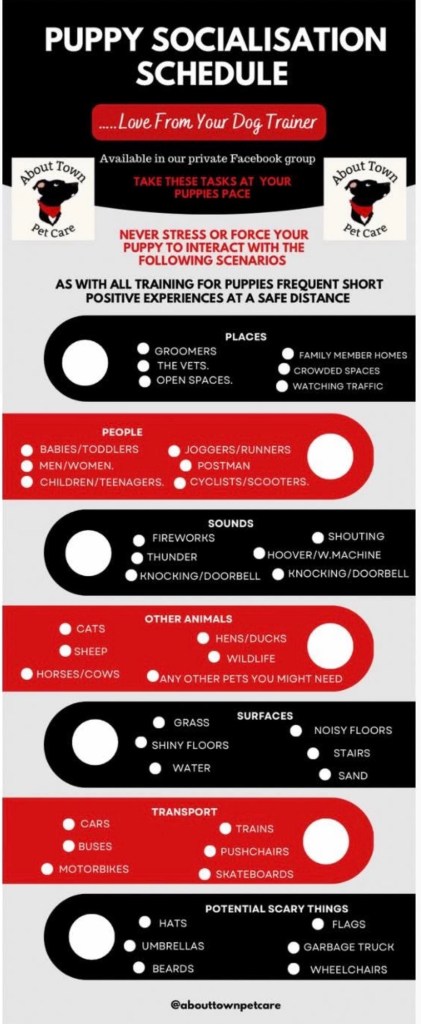
….love from your friendly neighbourhood dog trainer and behaviourist S. X
If you found this blog post helpful you might also want to read my previous blogs in the series – Seven of the most common issues found in puppy training👇
Start here with Part 1 – Help my puppy won’t settle at night
Part 2 – The Toilet Training Timeline
Part 3- How to prevent jumping up
Part 4- Nipping & Biting – The teething timeline